

Figure 2. Relaxed skin tension lines of the face.
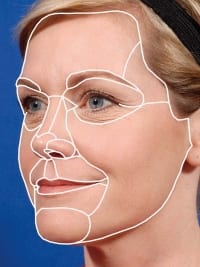
Figure 1. Aesthetic subunits of the face and nose.
“You will be known by your scars.”
I am not sure which famous surgeon can be credited with saying that for the first time. We’ve all heard it. It is a statement that really distinguishes the “good” plastic surgeons from the “bad” plastic surgeons. Nothing can wreck a new surgeon’s reputation faster than turning out bad scars in their work. Nothing can boost your reputation more reliably than being known for minimal if not nearly invisible scars. This is true not only for cosmetic procedures, it is also true for scar revisions of post-traumatic wounds that inevitably find their way to you.
Like everything we do in cosmetic and reconstructive surgery, the first step to a satisfactory outcome with scar revision is a detailed analysis and correct diagnosis of the problem. Only then can you develop a treatment strategy that will target the problem successfully. Scar revision involves much more than simply excising a scar and doing a better closure of the wound. Successful scar revision is really all about disguising the fact that a scar is present and will always be present. It is a matter of tricking the observer’s eye into overlooking or ignoring the scar’s presence.
FAVORABLE VERSUS UNFAVORABLE SCARS
What makes a scar noticeable? It really comes down to four factors with regard to whether a scar is “favorable” or “unfavorable.”
1) Flatness. Scars that are flat with the surrounding skin can always be covered by makeup and are favorable. Scars that are raised or depressed are associated with a shadow that no amount of makeup will disguise. These raised or depressed scars are unfavorable.
2) Texture. As a rule, scars tend to be smoother and shinier than the surrounding skin, and this texture difference is always unfavorable. The wider the scar, the more noticeable the texture difference; therefore, the scar is more unfavorable. Makeup cannot correct the texture difference that makes these scars noticeable. On the other hand, very narrow, razor-thin scars minimize the texture differences and are therefore more favorable.

Figure 3. The vertical component of this forehead scar was unfavorable. Irregularizing it with geometric closure makes it more favorable.
It might be stated that a corollary of “texture” is the width of the scar. However, it is the texture of the wide scar that makes it noticeable.
Burn scars are so wide that revision may not be practical. In those cases, the application of the various collagen-stimulating technologies, such as ablative and nonablative lasers, may be the only strategy to improve texture.
3) Linearity. The linearity of a scar can be either favorable or unfavorable depending on a) the scar’s location and/or b) its orientation. Linear scars hide well in the linear “borders” between the aesthetic subunits of the face or nose (Figure 1). The incisions for a facelift are an obvious example of favorable linear scars in aesthetic subunit borders. Another example would be a linear scar that lies within the melolabial fold. However, move those same facelift or melolabial fold scars out to the middle of the cheek and the favorability of the linear scar becomes suspect.
This is where orientation with regard to relaxed skin tension lines (RSTL) on the face (Figure 2) and Langer’s lines on the body must be considered. Scars oriented along these low-tension lines are less prone to hypertrophy. More importantly, RSTLs are also natural wrinkle lines. Linear scars that mimic a natural rhytid line are often overlooked and are therefore favorable. Conversely, linear scars that cross those natural wrinkle lines are readily noticed as out of place and are unfavorable.
Now consider irregular or nonlinear scars. Irregularity is the principle of camouflage patterns. As a rule, irregular scars are less noticed by the eye and are more favorable.
4) Color. The final factor to a scar’s detectability is color, over which the surgeon has the least control. Redness of a healing scar is expected and can take months to fade. Avoidance of sunlight can speed the process along. Patients are advised that only time will fade the noticeable redness.
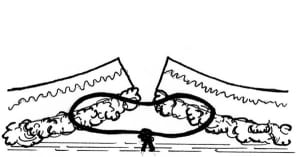
Figure 4. Buried dermal suture—note that the entry and exit depth at the skin edges are deeper than the “bite” of dermis.
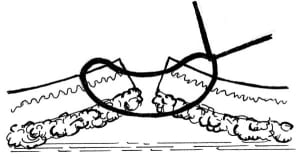
Figure 5. Vertical mattress suture.
Pulsed-dye laser treatment of red scars may or may not be effective at reducing redness sooner. Fortunately, makeup can easily hide the color issues. However, because color takes up to a year to run its course, you must consider the timing of scar revisions, especially when patients hope to be completely healed before a social event such as a graduation or wedding.
TREATMENT PLAN: MAKING UNFAVORABLE SCARS MORE FAVORABLE
When it comes to successful scar revision, the decision-making algorithm involves first identifying what is favorable and unfavorable about the scar and, by extension, what can be done to the scar to make it more favorable.
Is the scar in a visible portion of an aesthetic subunit of the face or nose (unfavorable) but near the border between aesthetic subunits (favorable)? Excising the intervening tissue and drawing the new scar into the aesthetic border may be the best strategy.
Is the scar well oriented along a RSTL (favorable) but too broad (unfavorable)? In that case, a simple linear excision and closure should be fine.
Is the scar extremely wide and large with a noticeable texture issue (unfavorable)? Then reduction of the scar by serial excision may be the first order of business.
Is the scar irregular (favorable) but depressed (unfavorable)? Then excising the depressed portion and performing a good skin-everting closure should do the trick.
Is the scar oriented across RSTL (unfavorable) and in the middle of a facial aesthetic subunit (unfavorable)? In this situation, you must accept the unfavorable location and instead camouflage the scar by irregularizing it using Z-plasty, W-plasty, or Geometric Closure techniques (Figure 3).
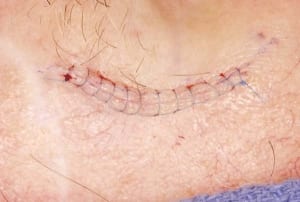
Figure 6. Running lock suture.
Some complex scar situations may require more than one strategy and/or more than one stage. Patience is a virtue in this business. You can always make a bad situation worse. Wound healing can’t be rushed. Your challenge is often convincing patients (or their parents) to be patient and take the long view.
WOUND-HEALING LIMITATIONS
You can have the best possible analysis and treatment plan and still be destined for a suboptimal outcome due to issues beyond your control. The time to discuss these limitations with your patient is before the scar revision, when it takes the form of an explanation, and not after when it is an excuse. Your patient must have realistic expectations. Some of the wound-healing limitation factors to consider include the following:
1) Location on the body. Some areas of the body tend to heal beautifully, like the upper-eyelid skin or the red lip. Other areas of the body are notorious for healing poorly, such as the skin over the sternum and the anterior chest, or across joints such as the knee. Patients must be informed up front about the limitations of scar revision on difficult areas of the body.
2) Patient genetics. Some patients are genetically prone to hypertrophic scarring or keloid formation—people of color and people of Irish descent can have this trait. Always examine other scars on the body of your patient to assess this risk. These patients must be made aware that their wound-healing characteristics will limit the success of the scar-revision outcome. Close follow-up and aggressive use of intralesional steroids or other adjunctive therapies may be necessary.

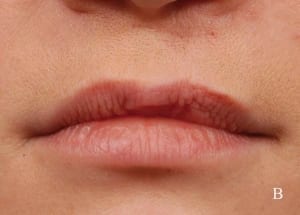
Figure 7. A) “Whistler” deformity of a cleft lip requires lengthening of white lip philtral ridge. B) Z-plasty lengthens the vertical height to help correct the deformity (V to Y advancement flap of red lip also performed).
3) Age of the patient. Although newborn infants can heal beautifully, in my experience some growing children with their revved-up growth factors can be prone to hypertrophic scars. Although parents will pressure you to revise a child’s cheek scar at a growing age, I find that it is often prudent to wait until the scar actually bothers the child (around age 12 for most children), when the growth factors have slowed and the wound healing is less prone to hypertrophic scarring.
At the other end of the spectrum are the elderly, with their loose, inelastic (and therefore tension-less) skin. Lack of tension on the healing wound is an essential ingredient to achieve a razor-thin scar. The elderly also have a plethora of wrinkles to hide scars.
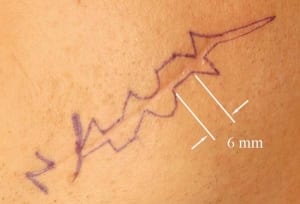
Figure 8. Geometric closure plan—Each side is a mirror image of the other side.
THE FUNDAMENTALS: METICULOUS WOUND CLOSURE
The basics of good wound closure will make or break your results. The principles of good wound closure bear repeating here, as I have witnessed the work of many experienced surgeons who have forgotten (or chosen to ignore) what we were all taught.
Wide and generous undermining minimizes tension on the closure and helps prevent standing cone deformities, or “dog ears,” at the ends of the closure.
Layered, tensionless closure—Tension on the healing wound results in thick hypertrophic scars or, alternatively, in widened atrophic scars. Neither of these is favorable. The only way to take all tension off of the healing wound is to close the wound in layers using long-lasting absorbable sutures in the buried layers.
When the subcutaneous suturing is complete and prior to the placement of skin sutures (or cyanoacrylate adhesives), there should be no gaps in the wound. Skin sutures are for edge leveling and edge eversion, not for holding wound tension. It is the buried sutures that should completely close the wound and hold all tension off the skin edges.
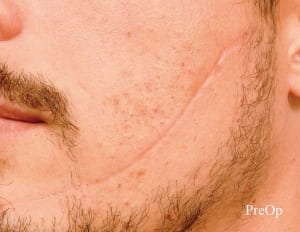
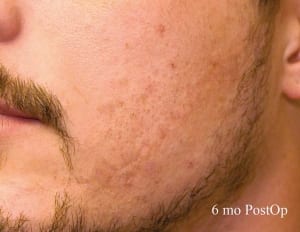
Figure 9. Geometric closure irregularizes an unfavorable linear scar.
Recall that at 1 week (when most skin sutures are removed), wound strength is less than 10%. After the skin sutures are removed, the skin edges will once again be exposed to any tension forces that were present before the skin sutures were placed. Long-lasting absorbable sutures, such as polyglactin or polydioxane, are preferred, since wound strength even at 6 weeks is still only about 75%.
Skin eversion—Scars tend to sink and depress as they go through their contraction and remodeling phase. It is, therefore, important to ensure that the skin closure is overcorrected, or everted, above the skin surface. If the final scar is still raised it is an easy thing to dermabrade down flat, but a depressed scar is nearly impossible to improve without another scar revision.
Certain stitches are better at everting (or raising) the skin edges than others. Well-placed buried dermal sutures, when done correctly, can evert skin edges without the assistance of skin sutures. The key to these sutures is to take a “bite” of the dermis well back from the wound edge and to enter and exit the wound edge at a deeper level than the bite of dermis (Figure 4).
Nothing will evert a critical skin edge more precisely than a well-placed vertical mattress suture in the skin. In a sense, this is the same as a buried dermal suture that has “surfaced” up through the epidermis (Figure 5). Combine a vertical mattress suture over a buried dermal suture for maximum eversion in difficult skin, such as the nasal tip. Vertical mattress sutures are also critical to everting the edges of tiny flaps, such as in Z-plasty and geometric closure.
My favorite suture for routine linear wound closure is the running lock suture (Figure 6). It is fast, precise, and everts the skin edges perfectly. Don’t forget to enter and exit the skin surface as close to perpendicular as the curved needle will allow.
Small sutures make small suture holes and, therefore, are less prone to leaving suture marks. Use the smallest skin suture possible to get the job done. I favor 7-0 on eyelids, 6-0 on the face and nose, 5-0 on the neck, and 4-0 on the extremities and trunk.
Sutures should stay in as long as possible for wound-strength purposes, but must come out in 5 to 7 days to avoid leaving suture marks.
THE TOOLBOX
Removing a scar and performing a scar revision involves the use of direct excision and closure, excision and irregularization, or excision and reconstruction with local flaps. The tools for accomplishing these things include the following:


Figure 10. Avulsion flaps often require both irregularization and thinning.
1) Fusiform excisions and linear/curvilinear closures. Many scars can be improved with a linear excision and closure, in particular if the scar lies near a RSTL or near an aesthetic subunit border. In these instances, the excision is done as a straight or curvilinear fusiform.
The primary pitfall with fusiform excisions and closure are the “dog ears” or standing cone deformities that can occur at the ends of the revision. The conventional thumb rule is to make the excision length at least three to four times as long as the excision is wide.
2) Serial excision. Overly wide scars can be subjected to a final linear scar revision once the scar width has been reduced in size. Multiple excisions of the scar over time (typically, 6 to 12 weeks apart) can effectively reduce a wide scar to something more manageable by conventional scar revision.
IRREGULARIZATION: Z-PLASTY, W-PLASTY, AND GEOMETRIC CLOSURE
When linear scar revision can’t make a scar more favorable, you must resort to the camouflage techniques that the “irregularization” of the scar achieves. Z-plasty, W-plasty, and Geometric Closure are all designed to convert a linear scar to an irregular one.
Z-plasty is a powerful scar-revision technique. The result not only irregularizes the scar but also lengthens it.
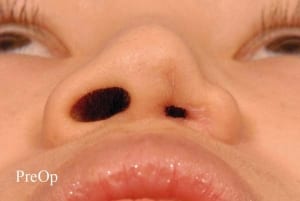
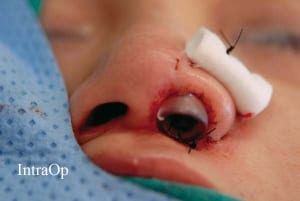
The ability to lengthen a scar is especially important where scars cross concavities and have formed “webs” or “bowstrings,” such as the medial canthal area of the eye, the lateral alar sulcus of the nose, or the axillary dome. This lengthening trait is also valuable in addressing contracted scars involving foreshortened skin segments, such as the philtrum of the upper white lip, the eyelids, or the skin around the oral commissures. Similarly, stenotic scars of the nostril, trach stoma, or umbilicus can be well corrected by Z-plasty (Figure 7).
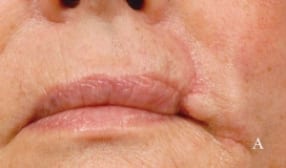
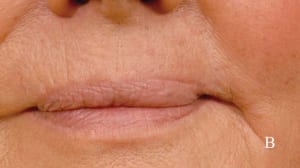
Figure 11. A “pincushion” deformity (left) is improved by proper sculpting of the flap bed (right).
W-plasty is a straightforward and simple way to irregularize any scar. The flaps are all triangles, and the result is a continuous zigzag that echoes the letter “w.” The design is easy to create and execute. The only downfall is that the resulting scar is “regularly irregular” and, therefore, as a mode of camouflage it may catch the eye more than the more sophisticated geometric closure.
Geometric closure is simply a W-plasty in which additional shapes—besides the triangular flaps of the W-plasty—are employed. The resulting scar is “irregularly irregular,” with the maximum potential for camouflage.
When you are unable to hide a scar in an aesthetic subunit border or unable to orient it along a RSTL, the geometric closure technique may be hard to beat. With good technique and a little postoperative dermabrasion, unsightly scars will virtually “disappear” into the background (Figures 8 and 9).
GEOMETRIC CLOSURE PEARLS
What follows is a list of helpful tips and pearls to achieving the best results from geometric closure:• Use a wide variety of geometric shapes for the flaps.
- Make sure that the length of each random pattern is at least 5 mm long. Anything less than 5 mm will tend to contract into linearity, and the irregularization benefit of geometric closure is lost.
- When excising the existing scar, preserve the underlying layer of scar tissue. This will help support and stent the tiny flaps as they heal, reducing the tendency to sink with contraction.
- Ensure the flaps are perfectly aligned without gaps or tension using the buried dermal sutures. Then, use vertical mattress sutures generously to evert the skin edges of the flaps. Overcorrect. The goal here is to have only raised or level scar lines to dermabrade smooth later.
- Don’t dermabrade the scar for at least 8 weeks postoperatively. This will avoid the tendency of the dermabrader to create a depressed scar by “scooping out” softer, immature scar tissue from the scar line.
AVULSION FLAPS—A SPECIAL CASE
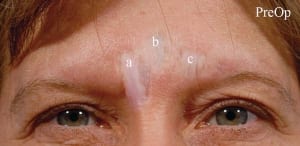
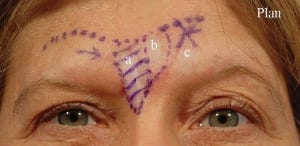
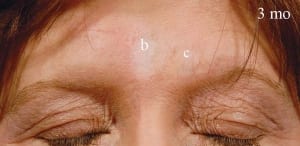
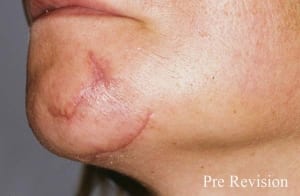
Figure 12. A widened glabella scar is revised using an advancement-rotation flap.
Many traumatic wounds include avulsion flaps, which tend to have severe thickness problems at both the scar line and within the flap itself once the wound heals. These wounds usually involve beveled or macerated skin edges that match up poorly on initial closure. The flap also tends to behave like a full-thickness skin graft as it heals, bunching up into a “pincushion” defect as the wound contracts.
Revising avulsion flaps requires an excision of the mismatched skin edges, as well as a thinning of the flap’s bed. Even in the best of circumstances there will be some subtle tissue-thickness issues between the flap and the surrounding skin. For this reason, strong irregularization of the flap’s scar line by way of multiple Z-plasties or a W-plasty can help blend the thicker involved tissue with the thinner uninvolved tissue (Figure 10).
To thin the tissue beneath the flap, it is best to undermine the flap at the desired thickness and “score” the underlying scar tissue into narrow strips with a scalpel. The strips of subcutaneous scar can then be sculpted away with pickups and sharp scissors to achieve the desired thickness and contour of the flap’s bed (Figure 11).
LOCAL FLAPS
Local flaps are random pattern flaps of adjacent skin that can be used to reconstruct a defect. Although these flaps are most often used in reconstruction of cancer defects, they are useful tools in scar-revision defects as well. Compared to skin grafts, flaps have a distinct advantage in scar revision in that the skin will most closely resemble the color and texture of the adjacent skin—two of the four factors in scar “favorability.”
There are a variety of local flap techniques, depending on the size and location of the scar revision defect:
- Advancement flap
- Advancement-rotation flap (Figure 12)
- Transposition flap
- Rhombic flap, and
- Bilobed flap.
ADJUNCTS TO SCAR REVISION
No discussion of scar revision would be complete without mention of the various adjuncts to managing scar tissue.
Immobilization—The less tension a healing scar experiences, the less prone it is to hypertrophy or widening. Splinting the wound around highly mobile tissue, such as the mouth or joints, can always be considered.
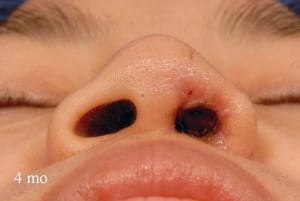
Pressure—Applied pressure to a wound will tend to counteract the forces of contracture and development of hypertrophic scarring. This can be particularly useful in orifices, such as the oral commissure or the nostril, where firm stents can be utilized to address contractures (Figure 13).
Intralesional injections—Injecting the scar with intralesional steroids, such as triamcinolone acetonide, in concentrations ranging from 10 mg/mL to 40 mg/mL, can be a powerful way to interfere with fibroblast activity.
Inject the scar at the first sign of hypertrophy and thereafter at 3- to 4-week intervals until the scar first begins to soften—the final effect is a delayed one. Start with the weakest dilution and work up for effect. I find it is rarely necessary to inject a scar more than two or three times. Be careful around areas of important subcutaneous fat, such as the chin or cheek, since fat atrophy is a potential side effect of injected steroids that can be difficult to correct.
Other intralesional agents that have been tried with some success are 5-FU and interferon.
 |
 |
 |
 |
 |
 |
| Figure 13. (above, top to bottom) Following Z-plasty and placement of a composite skin graft, this nostril was stented to prevent restenosis. | Figure 14. (above, top to bottom) Dermabrasion of an irregularized scar revision maximizes the aesthetic result. |
Silicone sheets—It is well known that the application of silicone sheets to a scar on a daily basis will tend to flatten and improve the appearance of hypertrophic scars. The mechanism of this effect is not well understood. The silicone sheet can be applied as a solid rubber sheet or can be applied as a liquid gel that hardens into a solid. Nightly application over several months can be prescribed.
Laser treatments—A variety of ablative and nonablative laser technologies have been applied to scar treatments. These include pulsed-dye lasers for treating red, hypertrophic scars; nonablative lasers (such as Fraxel) for stimulating neo-collagenesis within scars; and the ablative CO2 and Erbium-YAG fractionated lasers, also for stimulating neo-collagenesis.
Ablative lasers have also been used in lieu of traditional dermabrasion for the blending of scars with surrounding skin.

On The Web!
See also "Solving the Scar Problem" by Jerome D. Chao, MD, in the March 2006 issue of PSP.
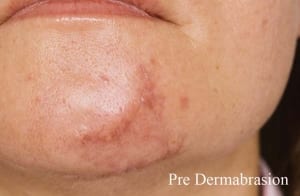
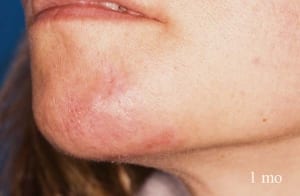
Dermabrasion—The tried and true method of smoothing and blending scars with the surrounding skin. Dermabrasion can be performed with powered hand motors and diamond fraises or wire brushes. It can also be as low-tech as the use of sterile sandpaper. For optimal results, wait at least 8 weeks before dermabrading a scar (Figure 14).
CONCLUSION
When approaching a scar in need of revision, the surgeon should proceed methodically. First, identify what is unfavorable about the scar and determine what treatment strategy (or strategies) can make it more favorable. Think beyond simple excision and closure in all but the most favorable scar situations.
Don’t forget to consider any wound-healing limitations of the patient and communicate those limitations to your patient in advance of any treatment. Initiate the scar-revision strategy at the appropriate time for wound maturity or patient age, and execute the scar revision with time-honored wound-closure techniques. Don’t take shortcuts with timing or technique.
Finally, employ adjunctive therapies, such as dermabrasion, to maximize the final result.
David A. Hendrick, MD, is a triple board-certified surgeon and diplomate of the American Board of Cosmetic Surgery, the American Board of Facial Plastic and Reconstructive Surgery, and the American Board of Otolaryngology—Head and Neck Surgery. He runs a private practice in Salina, Kan.


