 |
More than 20 years ago, one of my patients was the first to ask about procedures available to enlarge and shape the buttock area. This male had researched what was available at the time and found nothing. At that time, I had begun to perform pectoral augmentations on a regular basis, but I admitted to this person that, to my knowledge, there was no implant or described procedure for buttock augmentation.
Fat transfer was an established technique for filling moderate contour deformities, so I offered this procedure to attempt some enlargement and shaping of his otherwise normal-appearing buttocks. He accepted, and the result was modest but acceptable to him. After several additional attempts, fat transfer proved to yield unreliable results as compared, for example, with augmentation of the breast, pectoral, chin, and other areas of the body using silicone implants.
Using a solid silicone carving block, I performed my first buttock augmentation in a male in l988. Since that time, the results of gluteal augmentation in men using solid silicone implants have yielded uniformly good results and have eclipsed any efforts for similar results using fat transfer. The following is my almost 20-year experience with male buttock augmentation using solid silicone implants.
Assessment of the Male
As with so many other areas of the body, the aesthetics of male buttock augmentation are quite different from those of the female. A well-developed and aesthetically pleasing male buttock shows firmness and more muscular development than the more voluptuous, rounded nature of the female buttock.
The typical male patient who requests gluteal augmentation has never had much volume in the gluteal area and usually has been unable to achieve much size through exercise. The assessment should include overall general health as well as any injuries or surgeries to the gluteal region that might impair the surgical augmentation. Particular attention should be paid to previous silicone injections to the area designed to achieve gluteal augmentation.
I have a subset of patients in my practice—both men and women—who have had “biopolymer” or other similarly misnamed fillers that are simply silicone injections. These injections may look good for a short time, but they very often lead to subcutaneous abscesses and chronic changes in the vascularity of the overlying skin, and result in discolorations, firmness, and soft-tissue deformities.
I show the prospective patient the implant, and I review the anatomy of the area. This makes it easier for the person to understand the procedure itself, the recovery, and the possible risks of this surgery.
The anatomy of concern in the gluteal area includes the overlying skin and the underlying fibrous and fatty subcutaneous layer. Beneath these layers is the broad gluteus maximus muscle.
The fascial covering of the gluteus maximus is so thin as to be essentially nonexistent. Underlying the gluteus maximus is a network of smaller muscles that in concert allow the hip to be moved in all directions.
It is therefore obvious that the placement of the submuscular gluteal implant is quite different from that of the submuscular pectoral or breast implant. In the gluteal area, there is no distinct skeletal structure that permits direct dissection as well as support for the implant.
The Surgical Plan
When planning for this procedure, it is best to use an implant larger than the one that might be ultimately placed for the patient’s requirements. One commercial implant best suits my purposes for aesthetics as well as for recovery and long-term considerations.
This implant is oval with the thickest part in the lower quadrant. The implant is smooth-surfaced and has the softest durometer reading. The male buttock is oblong rather than rounded, and the implant should reflect the natural anatomical shape of a well-developed male buttock.
The implant should not protrude laterally farther than the lateral buttock dimple to avoid a result that has an unnatural appearance, a feminine appearance, or the possibility of implant “show” at the thinnest aspect of the overlying soft tissue. Again, the well-developed male buttock is more longitudinally oriented, and every aim in planning should be to prevent a rounded or widened appearance.
I emphasize to the patient that the implant used is a soft but solid material that allows the surgeon to contour the implant intraoperatively to help ensure the best possible result for each individual.
The contouring or sculpting of the implant is quite often the most time-consuming part of the surgical procedure. Similarly to the procedures I have developed for abdomen, biceps, and triceps augmentation, the individual tailoring of the implant to the patient means that no pair of gluteal implants that I have placed is like any other pair.
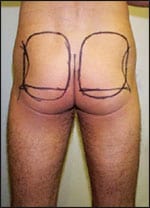 |
| Figure 1. Preoperative markings. |
What is particularly challenging about gluteal augmentation in the male is that—unlike women who have a thicker layer of overlying fat tissue—the augmentation must look natural in both the flexed and the relaxed positions, and this requires particular attention to the pocket dissection as well as contouring the implant itself. When all these details have been discussed with the patient along with those of recovery and surgical risks, attention is directed to the procedure itself.
Preparing for Surgery
In the preoperative room, the outlines of the flexed and the relaxed gluteal areas are drawn with a marking pen with the patient in the standing position (Figure 1). The superior aspect of the augmentation is outlined as well as the more inferior aspect. These markings are made in front of a mirror so the patient can offer input.
The implants are very soft, but their positioning should not be too low in the gluteal quadrant. In the inferior aspect of the gluteal quadrant, the soft tissue becomes thinner as it does in the lateral aspect, and the implant could be more easily palpated. I draw a horizontal line across the lower one third of the gluteal area, and plan on placing the implant no farther inferiorly than that line.
The patient is asked to flex his buttocks, and the lateral gluteal dimple is outlined. My plan is to avoid contouring the implant so widely that it protrudes beyond that line, which could result in a rounder or feminine result and may also result in a more palpable or visible result.
The incision is outlined overlying the sacral prominence. The patient may comment that the scar from such an incision may be too obvious. I explain that when the implant is placed and the incision is closed, the buttock crease is higher and deeper, hiding the resultant scar. In addition, the less sun-exposed area of this skin usually tolerates a very pale scar.
After general anesthesia, the patient is turned to a prone position with chest bolsters and antiembolic compression stockings are placed on the lower legs. Because of the concern for infection—as with any implant procedure—the gluteal area is widely washed with alcohol and allowed to dry. This is followed by a clear iodine solution prep, drying, and then another iodine prep (Figure 2A). I start patients on an oral antibiotic the day before surgery and continue this for a full 10 days; I also use an intravenous antibiotic during the operation.
The Beginning Incision
My surgical assistant and I double-glove, and we do not open the implants until just before contouring and placing them. The midline incision is made sharply down to the sacral periosteum (Figure 2B). Skin hook retraction allows for sharp dissection of the skin and subcutaneous flap laterally until the fibers of the gluteus maximus muscle are well identified, and then for a distance of approximately 5 to 7 cm from the midline and for 7 to 10 cm longitudinally (Figure 2C). There are usually multiple perforators in this area, and hemostasis can be easily attained with electrocoagulation or with a packing of short duration.
 |
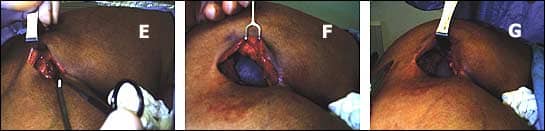 |
| Figure 2. Implant procedure steps. A: Prepped and draped patient. B: High sacral midline incision. C: Dissecting laterally over the gluteus maximus. D: Identifying and separating fibers. E: Dissecting deep to the gluteus maximus. F: Implant placement into the submuscular pocket. G: Muscle layer ready to be closed. |
The fibers of the gluteus maximus are divided in the direction of their travel from the sacrum to the hip (Figure 2D). This is where the dissection becomes bloodier and more difficult. As the gluteus muscle fibers travel laterally, the muscle layer becomes thinner and more tendinous in nature, so it is very important to try to stay as deep as possible beneath the muscle layer to provide the greatest amount of overlying soft tissue coverage (Figure 2E).
When a practitioner first performs gluteal augmentation, the dissection seems very deep, and it is common to dissect too superficially, which results in an inadequate submuscular pocket. A substantial pocket may be made, however, if the dissection is intramuscular rather than truly submuscular.
The superior aspect of the dissection overlaying the pelvic rim becomes very fibrous. I make an effort to avoid making the dissection too superiorly because postoperatively the implant could be pushed superiorly by the action of the gluteal area, and this could result in an implant position that is too superior, without enough filling of the inferior aspect.
The submuscular pocket is made with persistent digital dissection as well as sharp dissection using long scissors. The dissection becomes quite bloody with the disruption of muscle fibers; bleeding can be controlled with electrocoagulation, but it is better to use packs of laparotomy sponges saturated with an epinephrine solution. The packing allows for intraoperative stretching of the usually very tight overlying gluteus muscle.
Contouring the Implant
While the pocket is packed with hemostatic sponges, the implant for that side is opened and can be contoured with respect to the patient’s particular anatomy and in view of his augmentation goals. In contrast to earlier implants, the new softer implants are very easy to contour with heavy curved scissors. Most often, the lateral aspect of the implant is reduced to prevent the undesirable lateral bulging and rounding effect.
Sculpting is performed on the undersurface of the implant to reduce the possibility that the contouring will be palpable on the superficial aspect. When initial contouring is completed, the implant is placed in an iodine solution, and the packing is removed from the pocket of the implant.
Hemostasis is ensured, and the submuscular pocket is opened with a Deever retractor. The division of the muscle fibers in their natural direction is usually sufficient for inserting the soft implant, but it is sometimes necessary to sharply divide the muscle for less traumatic placement. Before initial placement and orientation of the implant, the pocket is irrigated with iodine solution (Figure 2F, above).
Notches may be made at the medial edge of the implant to assist the orientation of the implant following placement. The implant is folded and with some effort is placed within the submuscular pocket. After the Deever retractor is removed, the implant can be manually positioned for the desired effect.
Because of the softness of the implant, it may become folded upon itself during placement, and it is important that the implant is lying flat within the pocket and accurately positioned in the longitudinal axis. When assessing the result with the implant in place, the surgeon must remember that the overlying muscle is very tight, and that over a period of time this muscle will relax and result in a more natural appearance.
Contrasting the Sides
It is very gratifying to contrast the augmented side with the unaugmented side (Figure 2G, above). Before approaching the contralateral buttock, the augmented side is closed. The divided muscle layer is closed with interrupted simple sutures of a heavy (2-0) nonabsorbable suture. The deep subcutaneous layer is similarly sutured to the sacral fibrous covering.
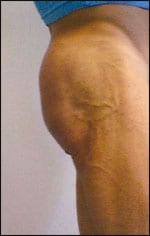
Before & After |
|
 |
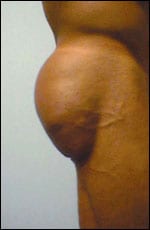 |
| This 34-year-old bodybuilder is shown before and 6 months after gluteal augmentation. | |
At this point, the prominently augmented result of the submuscular implant can be appreciated. The opposite side is then implanted and closed similarly. The final closure is quite important. To reduce the tension across the closure and to establish a buttock crease, interrupted 2-0 absorbable sutures are placed from the deep dermis of one side, down to and through the sacral periosteum, and back through the deep dermis of the opposite side. They are then tied.
This suturing procedure brings the skin down to the sacrum, resulting in a deep buttock crease that hides the incision, reduces the tension on the closure, and prevents an unnatural-appearing “tenting” across the final closure.
The area is cleaned and dried, and antibiotic ointment is applied to the incision and covered with gauze and a compressive garment or taping. The patient is returned to a supine position for initial recovery, after which he may lie in the position he feels is most comfortable.
Before the patient is sent home, he is encouraged to ambulate to the point that he is confident that he can remove himself from bed and ambulate at home. Postoperative pain is managed with narcotic pain medications and muscle relaxants.
Because the gluteal area cannot be immobilized postoperatively, as can the chest or arm areas, gluteal augmentation is probably the most painful augmentation procedure. This pain is most severe for only 2 to 3 days following surgery, after which it becomes more like soreness. The patient is encouraged to ambulate even on the day of surgery and certainly by the next day.
Antithromboembolism stockings are worn until the patient is fully ambulatory. After 3 days, all dressings are removed and the patient may shower and begin more normal ambulatory activities. The patient may return to resistance exercise of the lower extremities within 1 month following surgery.
Before & After |
|
 |
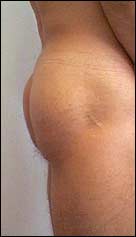 |
| This 31-year-old patient is shown before and 2 years after gluteal augmentation. | |
Risks and Complications
As with any surgery, there are risks inherent with gluteal augmentation. As mentioned previously, every attempt is made to reduce the risk of infection: perioperative antibiotics and showering with surgical soap solution, triple preps prior to draping, a higher midline incision, double gloving, and meticulous handling of the implants themselves.
Infection is very uncommon, but if it occurs, the clinical presentation may be difficult to assess because of the deep placement of the implant. A high index of clinical suspicion is required. The usual presentation is that several days postsurgery the patient should be feeling considerably less pain and more a deep soreness in the buttock area. If, however, the patient suddenly feels greater pain, perhaps on one side and not both; if the patient has an increased temperature, particularly at night; and if there is acute tenderness to deep palpation of the implant area, an infection may be present.
One method of diagnosis is large-needle (16- or 18-gauge) aspiration of the periprosthetic space. The expected aspirate would be thin, clear serous fluid. Thicker or colored fluid would indicate infection. Regardless, a culture and sensitivity of the fluid is performed and appropriate antibiotics are instituted.
At this point, removal of the implant is indicated with open packing of the wound for closure by secondary intent. Several months after final closure of the wound, the patient may consider a new implant for augmentation.
Before & After |
|
 |
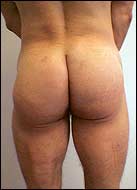 |
| This 28-year-old patient is shown before and 8 months after gluteal augmentation. | |
I have never seen a nerve compression in my patients, but this is a possibility. I consulted with one surgeon who asked for advice on a gluteal augmentation patient who had sciatic-type pain the first few days after her surgery. I counseled modest stretching exercises, and her symptoms soon resolved.
Implant displacement is the most common reason for returning a patient to surgery, but this presentation is uncommon. Men put the gluteal area through a great deal of physical stress by their involvement with sports, yard work, and so forth. Such stress contributes to the possibility of an implant rotating so much that the gluteal area appears asymmetric.
This can occur on one side but not the other and, because the implant used for male gluteal augmentation is oval, the asymmetry may be more obvious than a displaced round implant. Revision surgery can correct the rotational displacement using the appropriate maneuver of forming a new pocket, closing the expanded pocket with sutures, or recontouring the implant.
Seroma formation is also related to the degree of activity and physical stress that the gluteal area, and therefore the implants, are subjected to following surgery in men. Because seromas are rare, I do not place drains during the initial augmentation. Seroma may be diagnosed by physical exam that reveals asymmetry and a palpable fluid wave. This is confirmed by needle aspiration.
 |
| See also “Gluteal Augmentation” by Douglas M. Senderoff, MD, FACS, in the May 2006 issue of PSP. |
Seromas are usually self-limiting but may require a series of aspirations performed using a sterile technique over a period of a week or two. A persistent seroma may warrant placement of a drain.
With almost 20 years of experience with male gluteal augmentation, I have found that with the well-selected man and using soft, well-made implants, male gluteal augmentation is a very dependable and safe procedure, and it yields excellent long-term aesthetic results.
J. Howell Tiller, MS, MD, is a board-certified plastic surgeon at the South Beach Cosmetic Surgery Center in Miami Beach, Fla. He can be reached at (305) 534-9054 or .